Der Kampf um Lauffeldt
Was nun folgte wird von den Kartenwerken doch sehr unterschiedlich widergespiegelt [1]. Eine sehr präzise Darstellung liefern die drei Karten im Werk von le Beau und Hödl [2]. Die zeitgenössischen Gemälde von Parrocel [3] und Lenfant [4] konzentrieren sich auf den Blick des Königs hin zu dem massiven Kampf um das Dorf Lauffeldt. Ehe die französischen Truppen ernsthaft versuchen konnten Laeffeldt oder Vlytingen anzugreifen standen diese Dörfer in Brand. Die hannoveranische Artillerie war westlich, die schwere britische Artillerie östlich von Lauffeldt aufgefahren worden. Von den Gebäuden von Lauffeldt waren nur noch zwei übrig geblieben. Während Cumberland die Verteidigung von Vlytingen für illusorisch hielt und daher die Garden auch zurückgezogen wurden, sollte sich der ausgebrannte Meierhof von Lauffeldt als reinste Festung erweisen. Der Comte de Clermont hatte als erster die Aufgabe übernommen mit einigen Brigaden Infanterie Lauffeldt einzunehmen [5].
The fight for Lauffeldt
What followed is reflected very differently by the maps [1]. The three maps in the work of le Beau and Hödl [2] provide a very precise representation. The contemporary paintings by Parrocel [3] and Lenfant [4] focus on the king's gaze towards the massive battle for the village of Lauffeldt. Before the French troops could seriously attempt to attack Laeffeldt or Vlytingen, these villages were on fire. The Hanoverian artillery was deployed to the west of Lauffeldt and the heavy British artillery to the east. Only two of Lauffeldt's buildings remained. While Cumberland considered the defense of Vlytingen to be illusory and the guards were therefore withdrawn, the burnt-out Meierhof at Lauffeldt turned out to be a pure fortress. The Comte de Clermont was the first to take on the task of capturing Lauffeldt with a few brigades of infantry [5].
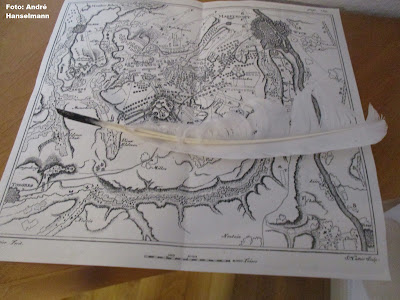 |
| Das ist eine unserer Karten. - This is one of our maps. (photo: André Hanselmann) |
Die Franzosen versuchten nun Welle um Welle Lauffeldt einzunehmen. Doch gelangen sie bisweilen nur bis an die äußeren Grenzen des Meierhofes, der offenbar trotz des Brandes sehr wehrhaft war. Gegen halb 2 Uhr musste der Maréchal de Saxe sogar weitere Truppen als Verstärkung vom König erbitten, damit diese sich ebenfalls in das Blutbad um Lauffeldt einmischten. Ein durchschlagender Erfolg war längst illusorisch geworden - aber zurück konnte de Saxe nach dem hohen Blutzoll auch nicht mehr ohne zum einen das Gesicht zu verlieren und zum anderen auch dem Gegner einen Vorteil zu überlassen[6]. Da die Niederländer unter dem Prinzen von Waldeck passiv in ihren Stellungen verblieben, entschloss sich de Saxe zu dem waghalsigen Unternehmen Lauffeldt von der linken Seite durch 3 Infanteriebrigaden unter Salières einzunehmen. Dieses Unternehmen führte schließlich zu einer beeindruckenden Reihe von Kämpfen im Zentrum.
The French now tried wave after wave to take Lauffeldt. But sometimes they only get as far as the outer limits of the Meierhof, which was apparently very well defended despite the fire. Around half past one the Maréchal de Saxe even had to ask the king for additional troops as reinforcements, so that they also got involved in the bloodbath surrounding Lauffeldt. A resounding success had long since become illusory - but after the heavy toll de Saxe could not go back without losing face on the one hand and giving the opponent an advantage on the other[6]. Since the Dutch under the Prince of Waldeck remained passive in their positions, de Saxe decided to take the daring operation of Lauffeldt from the left by 3 infantry brigades under Salières. This venture eventually led to an impressive series of fights at center.
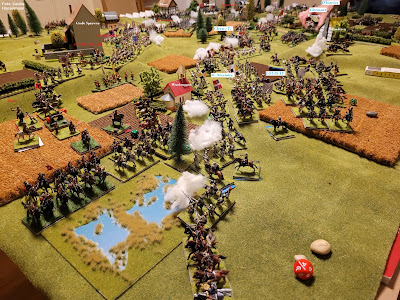 |
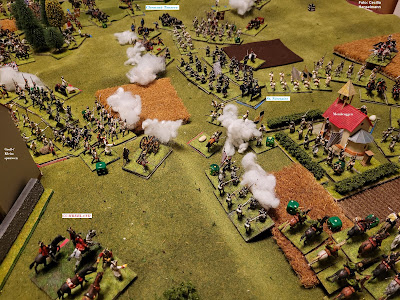
| In Runde 4 gelingt es mir die Lage an unserem linken Flügel endgültig zu stabilisieren. Ich habe die einzelnen Grenadiere ausreichend vorrücken lassen, damit diese Dauns Kavallerie die Stirn bieten können. Die Gendarmarie de France deckt die Flanke der Grenadiere. Membruggen ist anders als in der historischen Schlacht heiß umkämpft. Panduren haben zeitweilig das Dorf besetzt, können aber vom Ansturm zahlreicher Bataillone unter Saint-Nécetaires Kommando in die Flucht geschlagen werden. Daun führt seine gemischte Infanterie wie die hier kurz unterhalb Großspauwen aufmarschierten Hannoveraner heran. Vorsichtshalber habe ich auch die Maison du Roi hinter St. Necetaires Truppen dirigiert. - In round 4 I finally manage to stabilize the situation on our left wing. I've advanced the individual grenadiers enough for those Daun's cavalry to stand up to them. The Gendarmerie de France covers the flank of the grenadiers. Unlike the historical battle, Membruggen is hotly contested. Pandours temporarily occupied the village, but were routed by the onslaught of numerous battalions under Saint-Nécetaire's command. Daun leads his mixed infantry like the Hanoverians deployed here just below Großspauwen. As a precaution, I also conducted the Maison du Roi behind St. Necetaire's troops. (photo: Cecilia Hanselmann) |
Der Maréchal de Saxe führte diesmal die Schlacht anders als bei Rocoux praktisch von vorn, vor allem als er bemerkte, dass Salières Brigaden ihre Zeit damit vergeudeten sich mit niederländischen Freikompanien ein Feuergeplänkel zu liefern, ritt er persönlich an die Stelle um seinen Befehlen mehr Nachdruck zu verleihen. Tatsächlich erwies sich der Angriff nun als überraschend erfolgreich. Cumberland erkannte die Gefahr schließlich. Was darauf folgte war ein fulminanter Reiterangriff. Clermont-Tonerre hatte den Befehl erhalten die zurückgedrängten Gegner möglichst anzugeifen und einzuhauen, was er auch nach Kräften versuchte. Doch setzten sich die Hessen eine Weile zur Wehr und Generalmajor von Cannenburg mit der niederländischen Kavallerie warf sich den anreitenden französischen Kavalleristen, die de Saxe selbst instruiert hatte, entgegen. Doch Cannenburg konnte den Ansturm der französischen Reiterei nicht aufhalten. Dieser erlahmte erst, als er im Salvenfeuer hannoveranischer Infanterie stecken blieb. Obendrein machte sich bemerkbar, dass erhebliche Teile der nichtösterreichischen Truppen unter Hawley in den am heißesten umkämpften Bereich bei Laeffeldt beordert wurden. Besonders zeichneten sich die Reiter unter dem erfahrenen General von Hammerstein aus, welche eine von den Franzosen erbeutete Standarte zurück eroberten [7].
Unlike at Rocoux, the Maréchal de Saxe this time led the battle practically from the front, especially when he noticed that Salière's brigades wasted their time in skirmishing with Dutch Freikompanie, he personally rode in to reinforce his orders to lend. In fact, the attack turned out to be surprisingly successful. Cumberland finally recognized the danger. What followed was a brilliant cavalry attack. Clermont-Tonerre had received the order to attack and cut into the pushed-back opponents, which he tried to do as best he could. However, the Hessians put up a fight for a while and Major General von Cannenburg with the Dutch cavalry threw themselves against the approaching French cavalrymen, whom de Saxe himself had instructed. But Cannenburg could not stop the onslaught of the French cavalry. This only flagged when he got stuck in volley fire from Hanoverian infantry. On top of that, it was noticeable that significant parts of the non-Austrian troops under Hawley were ordered to the most hotly contested area near Laeffeldt. The cavalrymen under the experienced General von Hammerstein, who recaptured a standard captured by the French, distinguished themselves in particular [7].
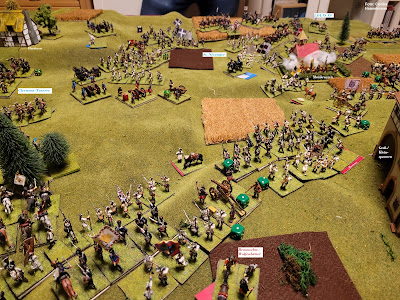 |
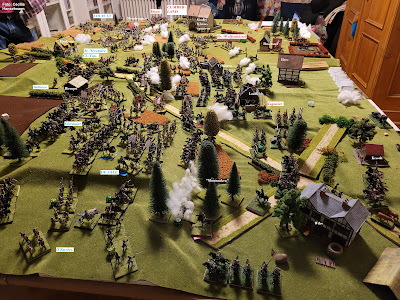
| Die Infanterie unter Braunschweig-Wolfenbüttel ist schwer gebeutelt durch das heftige Artilleriefeuer von Herderen her. Daun hat unterdessen die Zeit genutzt und ein Bataillon Hannoveraner nach Membruggen hinein geworfen. Das Dorf wird nun von mehreren Seiten aus angegriffen. Ich habe beschlossen, dass wir die beste Chance zu Erfolgen hätten, wenn wir Dauns dezimierte Reiterei mit unserer Infanterie nachsetzen. Um jegliche Gegenangriffe von Wolfenbüttel entgegen zu treten sind auch die Gardes Francaises mittlerweile im Raum zwischen Membruggen und Herderen erschienen. - The infantry under Braunschweig-Wolfenbüttel was hit hard by the heavy artillery fire from Herderen. Meanwhile, Daun used the time and threw a battalion of Hanoverians into Membruggen. The village is now being attacked from several sides. I decided that our best chance of success would be to follow up with our infantry on Daun's depleted cavalry. In order to counter any counterattacks from Wolfenbüttel, the Gardes Francaises have also appeared in the area between Membruggen and Herderen. (photo: Cecilia Hanselmann) |
Zwar waren die französischen Reitermassen Clermont-Tonerres schließlich wieder zurück gezogen worden. Aber den Verbündeten steckte teils der Schrecken in den Gliedern. Der Prinz von Waldeck nahm seine Truppen nach Rosmeer zurück [8].
The French cavalry masses from Clermont-Tonerres had finally been withdrawn. But some of the allies were terrified. The Prince of Waldeck took his troops back to Rosmeer [8].
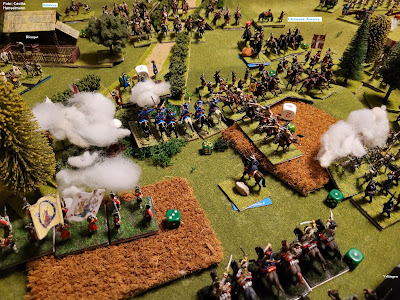 |
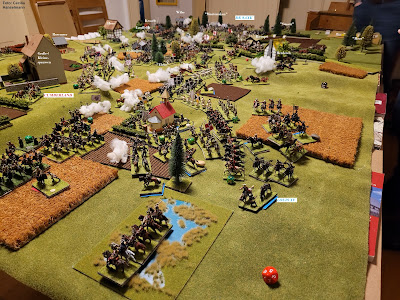
| Der Prinz von Waldeck hat bei uns im Zentrum eine Chance gewittert. Einige seiner Reiter sollen eine Batterie ausschalten. Doch Lt.Gén de Clermont-Tonerre schickt den Angreifern eines seiner Regimenter in die Flanke und es gelingt den niederländischen Vorstoß vernichtend abzuschlagen. Auch die niederländische Infanterie hat mittlerweile Vlytingen passiert und lässt sich auf ein Feuergefecht mit Salières Schweizern vom Regiment Bettens ein. Links im Bild erwehren sich irische Bataillone einem weiteren pragmatischen Vorstoß hier durch hannoveranische Infanterie. - The Prince of Waldeck sensed a chance in our center. Some of his riders are said to knock out a battery. But Lt.Gén de Clermont-Tonerre sends one of his regiments into the flank of the attackers and successfully repels the Dutch advance. The Dutch infantry has meanwhile passed Vlytingen and engages in a firefight with Salière's Swiss from the Bettens regiment. On the left Irish battalions are fending off another pragmatic advance here by Hanoverian infantry. (photo: Cecilia Hanselmann) |
 |
| Dauns Hannoveraner wurden rasch wieder aus Membruggen vertrieben und flüchteten bald Maastricht zu. Alle Versuche St. Nécetaires Infanterie zurück zu schlagen scheinen fruchtlos. Ich habe es geschafft die Gardes Francaises in eine Lücke zwischen einigen dezimierten Bataillonen der Brigade Navarre und Membruggen einzuschieben. Daun hat immerhin endlich seine Batterie auf der Anhöhe bei Großspauwen abprotzen können um mit Kartätschenfeuer die französischen Garden zu empfangen. - Daun's Hanoverians were quickly expelled from Membruggen and soon fled to Maastricht. All attempts to repulse St. Nécetaire's infantry seem fruitless. I managed to slip the Gardes Francaises into a gap between some decimated battalions of the Navarre brigade and the village of Membruggen. At least Daun was finally able to dismount his battery on the hill near Großspauwen to receive the French guards with grapeshot fire. (photo: Cecilia Hanselmann) |
Ligoniers große Attacke
Nun schlug die große Stunde, welche Ligonier oder die Schlacht an sich so berühmt machte. An anderer Stelle wird behauptet, dass Ligonier mit um die 60 Eskadrone immerhin 140 französische attackiert haben soll [8]. Am Höhepunkt der Schlacht befahl Ligonier Ségurs Kavallerie anzugreifen ohne eine dezidierte Erlaubnis zur Attacke vom Duke of Cumberland eingeholt zu haben. Während Colonel Forbes bei Wilre einige Geschütze aufgefahren hatte um Ségurs Reitern in die Flanke zu feuern, dirigierte Ligonier seine Reiterei gegen Montenaken gegen Ségur und D'Estrées Linienkavallerie [9]. Zwar konnte Ségur geschlagen werden, doch erwies sich das Gelände als sehr hinderlich. Ligoniers Reiter gerieten zwischen die Hohlwege bei Montenaken und ihnen schlug Geschütz- und Musketenfeuer entgegen. Von den besonders hart in dem Durcheinander getroffenen Hessen wurde der Prinz von Ysenburg verwundet und blieb liegen. Der Rückzug führte Ligonier in seine Ausgangsstellung und dort traf er den Duke of Cumberland, der nur knapp selber mit heiler Haut den Kämpfen mit der französischen Kavallerie entronnen war [10].
Ligonier's big attack
Now came the great hour that made Ligonier, or the battle itself, so famous. Elsewhere it is claimed that Ligonier with around 60 squadrons attacked at least 140 French [8]. At the height of the battle, Ligonier ordered Ségur's cavalry to charge without obtaining specific permission to charge from the Duke of Cumberland. While Colonel Forbes had brought up some artillery at Wilre to fire at Ségur's cavalry in the flank, Ligonier directed his cavalry against Montenaken against Ségur and D'Estrée's cavalry of the line [9]. Although Ségur could be beaten, the terrain proved to be very difficult. Ligonier's riders got caught between the sunken roads at Montenaken and were met with cannon and musket fire. Of the Hessians, who were hit particularly hard in the confusion, the Prince of Ysenburg was wounded and lay dead. The retreat led Ligonier to his starting position and there he met the Duke of Cumberland, who himself had narrowly escaped the fighting with the French cavalry with his skin intact [10].
 | |
| Ligoniers Flügel hat nun auch einiges abbekommen. Man erkennt schon links französische Kavallerie gegen Kesselt vorrückend. Ligonier hat ein Treffen seiner Infanterie in Kolonne Richtung Wilre schicken wollen. Doch diese Infanterie ist nun in Gefahr im ungünstigsten Augenblick angegriffen zu werden. Die Reste von Hammersteins Kavallerie müssen sich zurückziehen. Die Briten haben Lauffeldt besetzt. Aber hannoveranische Bataillone stehen weit voraus den Iren gegenüber. Der Prinz von Waldeck sendet Massen an Kavallerie zwischen Lauffeldt und Vlytingen vorwärts. Der Comte de Clermont hat seine Lage stabilisiert. Seine Batterie ist wieder bemannt. Die Massen von Infanterie unter Salières rücken im Zentrum vor. - Ligonier's wing has also taken a beating. One can already see French cavalry advancing towards Kesselt on the left. Ligonier wanted to send a meeting of his infantry in a column towards Wilre. But these infantry are now in danger of being attacked at the most inopportune moment. The remnants of Hammerstein's cavalry must retreat. The British occupied Lauffeldt. But Hanoverian battalions are far ahead of the Irish. The Prince of Waldeck sends masses of cavalry forward between Lauffeldt and Vlytingen. The Comte de Clermont has stabilized his situation. His battery is manned again. Masses of infantry under Salières advance in centre. (photo: Cecilia Hanselmann) |
Der Abzug der Verbündeten
Als der Comte de Clermont auf der Anhöhe bei Rosemeer ankam, sah er den geordneten Rückzug der Österreicher, der bis dahin den französischen Kommandeuren entgangen war. Das verdeutlicht die Besonderheit des zerklüfteten Terrains [12]. Cumberland hatte zuvor den Meierhof von Lauffeldt räumen lassen wobei die Geschütze, die sich nicht mehr hatten fortbewegen lassen, zurückbleiben mussten. Der Maréchal de Saxe war in den unübersichtlichen Reiterkämpfen im Zentrum nur knapp einer Gefangennahme entgangen. Für einen heftigen Vorstoß in den sich zurückziehenden Gegner waren nur noch wenige Truppen unter Ségur und D'Estrées verfügbar [13].
The departure of the allies
When the Comte de Clermont arrived on the rise at Rosemeer, he saw the orderly retreat of the Austrians, which had eluded the French commanders until then. This illustrates the peculiarity of the rugged terrain [12]. Cumberland had previously had the Meierhof cleared by Lauffeldt, with the guns that could no longer be moved having to remain behind. The Maréchal de Saxe had narrowly escaped capture in the confusing cavalry battles in the centre. Only a few troops under Ségur and D'Estrées were available for a violent advance into the retreating enemy [13].
 |
| In Runde 5 sieht es auch insgesamt schlecht aus für die Pragmatische Sache. Hannoveranische Reiter verlassen flüchtend das Schlachtfeld im Vordergrund. Zwar vermögen die in dem Wäldchen, das bei uns für Montenaken steht, die Panduren einen Angriff durch D'Estrées Infanterie abzuweisen. Aber D'Estrées hat noch genügend Truppen um nachzusetzen. Ligoniers Kavallerie hat sich in den erfolglosen Attacken gegen Clermonts Infanterie erschöpft. Man erkennt hier ganz schön wie zahlreiche von den Pragmatischen Verbänden ihre Auffangstellungen auf den Höhen verlassen haben. Nur Wolfenbüttels Infanterie steht noch vor Großespauwen. - In turn 5 it also looks bad overall for the Pragmatic cause. Hanoverian riders fleeing the battlefield in the foreground. It is true that the Pandours in the grove that stands for Montenaken in our country are able to repel an attack by D'Estrée's infantry. But D'Estrées still has enough troops to pursue. Ligonier's cavalry exhausted itself in unsuccessful attacks against Clermont's infantry. Here you can see quite nicely how many of the Pragmatic Associations have left their reception positions on the heights. Only Wolfenbüttel's infantry is still in front of Großepauwen. (photo: Cecilia Hanselmann) |
Nur Ligoniers Stellung erwies sich als schwierig, da leichte französische Truppen das mittlerweile auch durch Geschützfeuer ausgebrannte Wilre besetzt hatten. Ligonier warf sich nun den heran kommenden französischen Husaren mit elf Eskadronen entgegen. Zwar schien Ligonier anfangs zu siegen. Doch konnte d'Estrées schließlich das Blatt wenden indem er nicht nur frontal mit der Kavalleriebrigade Anjou die bereits gegen Husaren und Dragoner im Kampf befindlichen hannoveranischen und britischen Kavalleristen attackieren sondern auch durch Carabiniers von der Flanke angreifen ließ. Auch die berühmten Arquebusiers de Grassin und Fusiliers de la Morlière griffen in die Kämpfe ein indem sie Wilre verließen. Zwar gelang es den alliierten Reitern diesen leichten Infanteristen hohe Verluste beizubringen und sie nach Wilre zurück zu werfen. Doch wurde Ligonier selbst samit zahlreichen seiner Dragoner vom Regiment Stair, die ihn umgaben vom Rest seiner Kavallerie abgeschnitten und gefangen genommen [14]. Während die Dragoner von den Regimentern Stair und Cumberland meistenteils aufgerieben wurden, konnte sich das Meiste von Ligoniers Kavallerie und die noch dort zurück gelassenen Bataillone von Kesselt aus relativ unbehelligt absetzen.
Only Ligonier's position proved difficult, since light French troops had occupied Wilre, which had meanwhile also been burned out by gunfire. Ligonier now threw himself against the approaching French hussars with eleven squadrons. Although Ligonier initially seemed to win. However, d'Estrées was finally able to turn the tide by not only attacking the Hanoverian and British cavalrymen who were already fighting hussars and dragoons with the Anjou cavalry brigade, but also by having carabiniers attack from the flank. The famous Arquebusiers de Grassin and Fusiliers de la Morlière also intervened in the fighting by leaving Wilre. The Allied cavalry succeeded in inflicting high losses on these light infantrymen and throwing them back to Wilre. However, Ligonier himself, along with many of his dragoons from the Stair Regiment who surrounded him, were cut off from the rest of his cavalry and taken prisoner [14]. While the dragoons were mostly wiped out by the Stair and Cumberland regiments, most of Ligonier's cavalry and the battalions still left behind were able to leave Kesselt relatively unmolested.
 |
| Ein letzter Blick auf das Schlachtfeld. Die Moral der Pragmatischen Armee ist in Runde 5 gebrochen. Sie hat in einer Runde 2 Einheiten Infanterie (Panduren & hannoveranische Infanterie) und 2 Einheiten Kavallerie (niederländische und hannoveranische Kavallerie) eingebüßt. Nach Maßstäben von HoW sind sie bei -0,5 Punkten. Die Franzosen haben in der letzten Runde im Zentrum 3 Kavallerieeinheiten verloren, welche durch das Feuer der alliierten Artillerie getroffen wurde und sich teilweise gegenseitig in der Flucht mitgerissen haben. Damit kommt die Armee des Maréchal de Saxe auf noch 6 Punkte. (Mehr dazu weiter unten.) Ich war einigermaßen überrascht über unseren Sieg, da wir meine ursprünglichen Pläne nicht ausgeführt haben. Dafür sind die Alliierten agressiv vorgegangen und haben ihre exzellenten Stellungen verlassen und die Dörfer garnicht ausgenutzt. - One last look at the battlefield. Pragmatic Army morale is broken in turn 5. She lost 2 units of infantry (Pandurs & Hanoverian infantry) and 2 units of cavalry (Dutch and Hanoverian cavalry) in one turn. By HoW's standards, they are at -0.5 points. In the last round, the French lost 3 cavalry units in the center, which were hit by Allied artillery fire and partially carried each other away while fleeing. This brings the army of Maréchal de Saxe to 6 points. (More on that below.) I was somewhat surprised by our victory as we didn't carry out my original plans. In return, the Allies acted aggressively and left their excellent positions and did not exploit the villages at all. (photo: Cecilia Hanselmann) |
Die Österreicher hatten sich durch ein leichtes Vorrücken immerhin ebenfalls die Franzosen vom Leib halten können. Die alliierte Armee war soweit gerettet worden auch wenn sie de Saxe das Feld überlassen musste. Die Franzosen verzeichneten in jedem Fall höhere Verluste als die pragmatische Armee, was anhand der besseren Stellungen und dem agressiven verlustreichen Vorgehens der Franzosen wenig überraschen mag. Fast 10.600 Mann sollen sie verloren haben, was einen beträchtlichen Anteil ihrer Armee darstellt - typisch hoch für die Franzosen [15] waren die Verluste auch unter den Generälen wovon vier getötet worden waren. Die Verbündeten hatten halb soviele Verluste. Anders als Rocoux trug der Sieg bei Lauffeldt tatsächlich zu einem erfolgreichen weiteren Verlauf des Feldzuges der Franzosen bei [16].
The Austrians had at least been able to keep the French at bay by advancing slightly. The allied army had been saved so far, even if they had to leave the field to de Saxe. In any case, the French recorded higher losses than the pragmatic army, which is not surprising given the better positions and the aggressive, costly approach of the French. They are said to have lost almost 10,600 men, which represents a considerable proportion of their army - typically high for the French [15] the losses were also among the generals, four of whom were killed. The allies had half as many casualties. Unlike Rocoux, the victory at Lauffeldt actually contributed to a successful further course of the French campaign [16].
Text: André Hanselmann
Fotos: André Hanselmann & Cecilia T. Hanselmann
Szenario für das Tabletop-Hobby (HoW) / Scenario for wargaming hobby (HoW):
French Army
LOUIS XV (Dep.) / MARÉCHAL de SAXE (Dash.)
Reserve (under the king's command)
1) D’Aspremont (Dith.):
Gardes Francaises
- 2 x gardes (large)
- 1 x artillerie lourd (reserve)
2): St. Clair (Dith.) Maison du Roi
- 1 x Gardes du Corps (small)
- 1 x Mousquetaire de la Garde (small)
- 1 x Gendarmes&Chev.de Garde (small)
- 1 x Grenadiers à Cheval (small)
3) Du Chatelet (Dep.)
1 x Gendarmarie de France (Dauphin, Berry, Reine, Orléans,
Écossais) (large)
1 x Dragons (“Colonel-géneral dragons” – Royal)
Corps D’Estrées (Dep.)
4) Brig. Claude de A.-Lynden (Dep.)
- 3 x hussards. (Bercheny, Pollereski)
5) Brig. Grassin (Dep.)
- 1 x grenadiers
- 1 x light infantry (Grassins)
- 1 x hussards (Grassins à
cheval)
6) Lt. Gén. Du Chayla (Dep.)
2 x cavalerie (Conti)
Corps du Prince de Clermont (Dep.)
7) independent
- 1 x hussards
8) Lt.Gén. Lautrec (Dep.) ?
- 4 x infanterie (La Fère,
Royal-Suédois)
- 1 x artillerie légère
9) Lt.Gén. Ségur
(Dith.)
- 2 x cavalerie (Harcourt)
- 1 x dragons (Beauffremont)
Corps de Clermont-Tonerre (Dep.)
10) Lt. Géneral de Bavière (Dep.) – killed on a 8-12 / Brigadier Croy (Dep.)
- 5 x cavalerie
11) Lt.
Gén. Chabanois (Dep.) ?
- 5 x cavalerie
Corps de Lt. Gén. de Salières (Dep.)
12) MdC Montbarey (Dep.) / MdC Guerchy (Brig. Roi) (Dash.)
- 4 x infanterie (« Roi »)
- 1 x artillerie légère
13) Lt. Gén. Clare (Dash.)
- 4 x infanterie (Rooth, Clare, Berwick, Dillon)
- Superior
14) MdC
d’Havré (Dep.)
- 3 x
infanterie (Royal-Vaisseaux)
15) Brig. Guiry
(Dep.) ?
- 2 x cavalerie (cuirassiers(1),
Carabiniers (large))
Corps de Seneterre (Dep.)
16) MdC A.L.H. de Thiard (Dash.)
- 3 x
cavalerie (Mestre
de camp(1-2), Colonel Gén. (1))
- 1 x
dragons
17) Grand Batterie at Herderen (Dep.)
- 2 x medium artillerie
- 1 x artillerie légère
18) Brig. Stainville (Dith.)
- 4 x infanterie (Navarre)
19) Lt.Gén. de Bouteville (Dith.)
- 4 x infanterie
(Auvergne)
20) Lt. Gén. D’Hérouville (Dep.)
- 2 x infanterie (grenadiers) (small)
Breaking Point : 15
Pragmatic Army
CUMBERLAND (Dith.) / BATTHYANY (Dep.)
I) GFWM Trips (Dashing)
- - 1 x Husaren (Ghilanyi)
- - 2 x Kroaten
General Ligonier (Dash.) – captured on
a 8-12 - Allied cavalry
II) Ysenburg (Dep.) – w
+ captured on a 8-12 / replaced by Hawley (Dith.)
- - 1 x british dragoons (Queens Own, Inniskillin)
- - 1 x Hannoveranische Kavallerie
- - 1 x hessische Kavallerie
III) Hammerstein (Dep.)
- 2 x hannoveranische Reiter (Leibregiment, Pöllnitz)
- 1 x British dragoons
IV) independent
- - 1 medium artillery
Duke
of Cumberland (Dith.) - Allied infantry
V) independent
- - 1 x British guards (superior) in Vyltingen
VIVI) Lt.Gen. Albermale (Dep.) / Prinz Friedrich v. Hessen (Dep.)
-
- 1 x brit. Infantry(Pulteney’s)
-
- 2 x han. Infanterie
-
- 1 x hessische Infanterie
-
- 1 x han. leichte Artillerie
VII) G.d.I. v. Sommerfeld (Dep.) / Druchtleben (Dep.)
- - 1 x brit. Inf. (King’s Regiment)
- - 1 x hannoveranische Infanterie (Zastrow, Schulenburg)
VIII) independent
- - 1 x Heavy British artillery
Waldeck (Dith.) / Prinz von Sachsen-Hildburghausen (Dith.)
IX) GL Coenders (Dep.)
- 2 x niederl. Kavallerie (Karabiniers etc.)
X) Cannenburg
(Dep.) ?
- 3 x niederl. Kavallerie
XI) Smissaert (Dep.) 8-12 / Sturler (Dash.)
- - 1 x niederl. Infanterie („Waldeck“)
- - 1 x bayerische Infanterie
- - 1 x niederl. Freikomp.
- - 1 x niederl. Leichte Artillerie
Batthyányi (Dep.)
XII) FML Tornacco (Dep.)
- - 2 x Füsiliere (Wurmbrand, Marulli-„Haller“)
- - 1 x Grenadiere
- - 1 x leichte Artillerie
XIII) FML Dungern (Dith.)
- 3 x Füsiliere (Botta, Prié-„Arberg“, Ungarn)
XIV) FML de Fin (Dep.)
- 1 x Kürassiere (Bentheim)
- 1x Dragoner
XV) GdK Pàlffy (Dep.)
- - 1 x Dragoner
- - 1 x Kürassiere
FZM Braunschweig-Wolfenbüttel
(Dep.)
XVI) FML Marschall (Dep.)
- - 2 x Füsiliere (Bayreuth, Arenberg)
- - 1 x Grenadiere
- - 1 x mittlere Artillerie
XVII) independent
- 1 x Grenadiere zu Pferd (Superior)
FZM Daun (Dash.) “Avantgarde”
XVIII) GL Hawley (Dep.) – if transferred with allied horse to the left – Bournonville (Dep.)
-
- 2 x Austrian Dragoons (mix)
-
- 1 x Dutch horse (Frangipani Hus.) – can be splitted
from the Avantgarde
-
- 1 x Hanoverian cavalry (mix) – can be splitted from
the Avantgarde
XIX) FML Grünne (Dith.)
- - 1 x Füsiliere (Salm)
- - 1 x Grenadiere
- - 1 x hannoveranische Infanterie
- - 1 x leichte österr. Artillerie
XX) Baranyày (Dep.)
- - 2 x Husaren (Nadasdy, Karolyi)
- - 1 x Kroaten
Breaking Point: 9,5
Victory:
Breaking Point
French special: capture Wilre &
Lauffeldt
Terrain:
Villages:
Laeffeld (Meierhof) & Große
Spauwen heavy cover
Vlytingen & Laeffeldt burning
for turn 1-2
All other villages light cover
Woods:
representing other villages, half move for passing through
Limit: 6 turns
About our game:
For those who are interested in our game, I will give you an impression about the exciting development of the game. That short part is in English only.
We were 4 gamers - 2 per side. The French have an advantage in numbers and in breaking point besides a fine overall commander. The Pragmatic army has better troops and a perfect position.
We decided to give the gamers the chance to discuss the tactic for the battle before the 1st turn. Afterwards the leading commanders (M.de Saxe and king Louis for example) could communicate only in letters - arriving in the next turn. We wrote just one message per turn. But they could communicate directly when the commanders are together (which the Allies did for the whole game - maybe because Cumberland has no real influence on the morale of his troops as he is a "Dithering" commander following the HoW-rules).
I will focus on the more surprising aspects of the game. I in the role of king Louis XV had planed to defeat the Allies on their right wing, because I supposed that the superior quality of the red coats and the strengh in artillery around Lauffeldt would make it too difficult to succeed with our own right wing. Although my comrade in the role of the Maréchal de Saxe later on showed no inclination to follow my plan of a feint attack with D'Estrées and limited forces under the Comte de Clermont against Wilre. In contrary he moved the massive center with our best infantry including our Swiss and Irish units forward.
The beginning of the battle was a desaster for us. St. Nécetaire's presence next to the commander of our left wing cavalry resulted in a dashing charge against superior Allied forces. Meanwhile our massive cavalry in the center under Clermont-Tonerre (under the orders of de Saxe) advanced against the British guards. The guards were routed after some fighting but the French cavalry was moved in a dangerous position to be demaged not only by heavy Allied artillery fire but by a decisive Allied counter attack especially by Batthyàny's horse too. That resultet in a very much shaken French center. St. Nécetaire lost one unit of horse and one of dragoons in turn 1 and on top of that three units of horse and one of hussars in the center in turn 2 (9 p. left). The Pragmatic army lost two units only in both turns (7 p. left).
But to my greatest surprise the Allies reacted to our movements very strangely. They left their fine positions on the hills and tried to occupy Membruggen and defend the village. That was difficult especially because they had to wait for reinforcements by Daun's vanguard. Daun's infantry was very slowly moving and his cavalry had to face the problem, that I could bring my grenadiers from the extreme left flank in a position to stop the Allies from benefit from the defeat of St. Nécetaire's cavalry. Besides we had a superiority in artillery in that area with 4 batteries against 2 batteries of Braunschweig-Wolfenbüttel's and Batthyàny's forces (before Daun could finally unlimber his artillery). Our artillery inflicted a lot of losses in the ranks of the Austrian infantry. The fighting for Membruggen from the Pragmatic perspective was a fruitless attempt to secure their wing or to beat my left wing instead. The Allies lost one unit of Hanoverian horse, one of Austrian hussars and one of Austrian horsegrenadiers (4 p. left) in turn 3. In turn 4 the Austrians lost a single batallion of infantry (3 p. left).
We noticed that the Allies did'nt waited for our assault in their strong positions. Therefore I gave up my initial plan. The Irish could face off the Allied attempt to break them with their superior musketry. Ligonier's cavalry got the order to challenge our right wing and to overrun the artillery of the Comte de Clermont but even with superior rated horse and dragoons had little chance to deal with French line infantry in good shape. Therefore it's maybe no surprise that the Allies lost in the last 5th turn especially on their right wing one unit of Hanoverian horse.
In the end the Allied still hold Wilre and Lauffeldt but had just lost too many units: 1 unit of Dutch cavalry, 1 British guards (1.5 p.), 1 bn. of Austrian infantry, 1 bn. of Hanoverian infantry, 1 pandours (0,5 p.), 2 Hanoverian horse, 1 of Austrian horsegrenadiers, 2 Austrian hussars. Our French losses were only in cavalry (7 units of French horse, 1 unit of dragoons, 1 unit of hussars) which tells a lot about the character of the fighting.
Anmerkungen/Notices:
1) z.B. - for example: Daniel Paterson (+1749): "A PLAN / OF THE / BATTLE of / LAFFELDT / With the Different Motions of both / ARMIES / In the Months of Iuly & Aug.t c.1747" Royal Collection, RCIN 730140
2) siehe hier: https://maps.hungaricana.hu/hu/HTITerkeptar/25163/view/?bbox=-168%2C-7877%2C4997%2C-5894
3) Charles Parrocel (1688-1752): "Bataille de Lawfeld. 2 Juillet 1747" Choisy-le-Roi, nun: Musée national des châteaux de Versailles et de Trianon, im Besitz des Französischen Staates, MV 213 ; INV 7121 ; B 917
4) Pierre Lenfant (1704-1787): " Bataille de Lawfeld, le 2 juillet 1747 - Louis XV indiquant de la main le village de Lawfeld au maréchal de Saxe" (vor 1771), Musée national des châteaux de Versailles et de Trianon
5) Hödl / le Beau S. 595-597
6) Le Beau / Hödl S. 608
7) Auch bei Rocoux hatte Hammerstein am besonders umkämpften Flügel mit seiner hannoveranischen Kavallerie eine Rolle gespielt. - At Rocoux Hammerstein had to play an important role at the especially hard fighting wing with his Hanoverian cavalry too.
8) Le Beau/ Hödl 609-614
9) Battlefield Anomalies HP using Whitworth: "Field Marshal Lord Ligonier", page 153
10) Also nicht die Husarenregimenter, sondern die andere sogenannte "Cavalerie Légère" der Brigaden Anjou und Royal. - That means that these were not regiments of hussars but so called "Cavalerie Légère such as the brigades Anjou and Royal.
11) Le Beau/Hödl S. 615-617
12) ebenda S. 624
13) ebenda S. 619
14) ebenda 620-621
15) Man denke an Lt.Gén. duc de Grammont, der bei Fontenoy gefallen war, oder Lt.Gén de Fénelon bei Rocoux. Bei Lauffeldt zählt sicherlich der Comte de Bavière zu den bekanntesten Todesopfern (1695-1747). Er war immerhin ein Nachkomme von Kurfürst Max Emmanuel von Bayern. - You can remember the Lt. Gén. duc de Grammont who was killed at Fontenoy or Lt. Gén de Fénelon who was killed at Rocoux. Naturally the comte de Bavière (1695-1747) was counted as one of the most famous losses killed in action as he was the descendant of the elector Max Emmanuel of Bavaria.
16) Le Beau / Hödl S. 628-629
What a massive, bloody and exciting to read battle! Your table and minis offered a grand spectacle! It was very interesting that you provided the historical battle in such a detail, alongside with the annotated battle photos! Many congratulations for your effort, it was a huge project! Kudos also to Cecilia for high quality photos! And thanks for sharing all this! Cheers!
AntwortenLöschenThank you for your comment. I'm always happy when readers like you find some inspiration in our accounts about the battles of the WAS.
LöschenThank you very much! Taking the pictures is part of the fun for me :D
LöschenWow! That's an epic pair of posts for an epic battle. Thanks very much André. The game looks great too.
AntwortenLöschenI'm very glad that you like it. I suppose that our next large battle could be Dettingen next year.
LöschenLooks great! A superb and spectacular game!
AntwortenLöschenMerci pour ton commentaire.
Löschen